Why?
Due to the ever-evolving world of information technology, computational needs are increasing day by day while the ability to miniaturize processors is about to reach its cap. That is where parallel and distributed computing comes in! With the concept of parallel computing, you can train a single AI model on multiple machines simultaneously.
How?
Just buy a few machines and setup mpicc. But seriously, what if you’re broke (like me) and lazy (also like me) but still want to get done with that one assignment that requires you to work on a cluster. You’re in luck because I have the perfect tutorial for you.
Pre-requisites
- Set up a Linux virtual machine
- Set up Docker and Docker Compose
Steps
- Clone the repository
1
git clone https://github.com/NLKNguyen/alpine-mpich
- Navigate the the
clusterdirectory1
cd alpine-mpich/cluster/
(The next two steps can be skipped for just poof of concept)
- Place your MPI-ready source code(s) in the
projectdirectory Modify the Dockerfile and replace
mpi_hello_world.cwith the entry point for your source code- Build an n-machine cluster using
docker-composewith thecluster.shstartup script1
sudo ./cluster.sh up size=<n>
- Login to the master container
1
sudo ./cluster.sh login
- Run your program on multiple machines!
1
mpirun ./mpi_hello_world
- Sample output:
1
2
3
4
5
6
7
  /project $ mpirun ./mpi_hello_world
  Warning: Permanently added 'cluster_worker_1.cluster_net,172.21.0.3' (ECDSA) to the list of known hosts.
  Warning: Permanently added 'cluster_worker_2.cluster_net,172.21.0.4' (ECDSA) to the list of known hosts.
  Hello world from processor 8fdb4a274e55, rank 0 out of 3 processors
  Hello world from processor 7d192a900f77, rank 1 out of 3 processors
  Hello world from processor b8d5d4ffae67, rank 2 out of 3 processors
Reference taken from the official Github repository for alpine-mpich
What is happening?
docker-compose
The following is the docker-compose file for this project
1
2
3
4
5
6
7
8
9
10
11
12
13
14
15
16
17
18
19
20
21
22
23
24
25
26
27
version: "2"

services:
  registry:
    image: registry
    ports:
      - "${REGISTRY_PORT}:5000"

  master:
    image: $REGISTRY_ADDR:$REGISTRY_PORT/$IMAGE_NAME
    user: root
    entrypoint: ["mpi_bootstrap", "role=master", "mpi_master_service_name=master", "mpi_worker_service_name=worker"]
    ports:
      - "${SSH_PORT}:22"
    networks:
      - net

  worker:
    image: $REGISTRY_ADDR:$REGISTRY_PORT/$IMAGE_NAME
    user: root
    entrypoint: ["mpi_bootstrap", "role=worker", "mpi_master_service_name=master", "mpi_worker_service_name=worker"]
    networks:
      - net

networks:
  net:
Docker compose is basically a tool to orchestrate containers locally without having to set up each one individually at run time. With the help of docker-compose, we are doing the following:
- Defining a master container with SSH open
- Defining a worker container
- Defining a virtual network for the cluster setup to communicate
- Connecting master and workers to that virtual network
Dockerfile
The following is the Dockerfile for the project
1
2
3
4
5
6
7
8
9
10
11
12
13
14
15
16
17
18
19
20
21
22
23
24
25
26
FROM nlknguyen/alpine-mpich:onbuild

# # ------------------------------------------------------------
# # Build MPI project
# # ------------------------------------------------------------

# Put all build steps and additional package installation here

# Note: the current directory is ${WORKDIR:=/project}, which is
# also the default directory where ${USER:=mpi} will SSH login to

# Copy the content of `project` directory in the host machine to
# the current working directory in this Docker image
COPY project/ .

# Normal build command
RUN mpicc -o mpi_hello_world mpi_hello_world.c

# ####################
# For Docker beginner:

# After Docker syntax `RUN`, you can execute any command available in
# the current shell of the image.

# To switch to root:    USER root
# To switch back to default user: USER ${USER}
The Dockerfile simply pulls the alpine-mpich image from DockerHub, copies the our source code from our local machine to the container and compiles it using mpicc
cluster.sh
The cluster.sh file is basically a startup script provided to us so that we don’t have to go through the hassle of following up on the docker-compose command syntax. It also creates the SSH key-pair for the master container
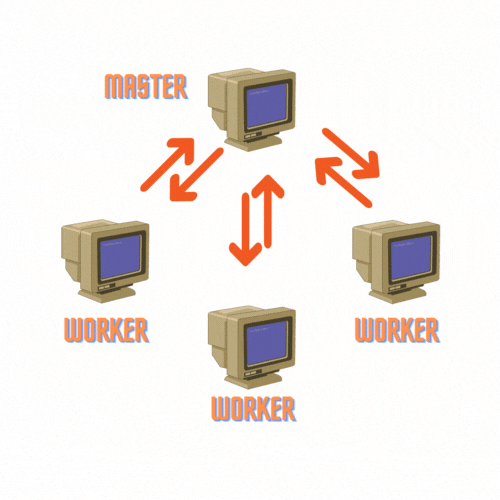
Basic Architecture
The master gets a specific task and splits it into multiple tasks/divides a task into parts and divides the workload among n number of workers (in this case n=3)
Conclusion
Even though this tutorial is just a PoC and works on a single host while emulating a cluster, it gives us the fundamental understand of how a distributed computing setup is achieved. alpine-mpich also supports Multi-host Orchestration. Anyway, knowing how to setup a cluster is absolutely essential for every computer scientist out there as distributed computing helps save time and make the impossible possible!