What is Snort?
Snort is one of the most popular open-source Intrusion Detection Systems (IDS). Snort is helpful in generating alerts based on the kind of traffic you declare unwanted for your network/host. IDS have become a vital component of network security. However, most people tend to avoid it due to complications in the configuration process. Today, I am going to try and help you install and configure Snort in the easiest way possible.
Installation
Installing dependencies
Before actually installing Snort, there are a couple of pre-requisite services that we need to install in order to configure and use Snort properly.
- Install the basic dependencies for Snort
1
sudo apt install build-essential libpcap-dev libpcre3-dev libnet1-dev zlib1g-dev luajit hwloclibdumbnet-dev bison flex liblzma-dev openssl libssl-dev pkg-config libhwloc-dev cmake cpputest libsqlite3-dev uuid-dev libcmocka-dev libnetfilter-queue-dev libmnl-dev autotools-dev libluajit-5.1-dev libunwind-dev libfl-dev -y
- Create a new directory for Snort installation files
1
mkdir install_snort && cd install_snort
- Install LibDAQ (Data Acquisition Module)
1
2
3
4
5
6
git clone https://github.com/snort3/libdaq.git
cd libdaq
./bootstrap
./configure
make && sudo make install
cd ..
- Install TCMalloc for better concurrency and performance (optional but highly recommended for production environments)
1
2
3
4
5
6
wget https://github.com/gperftools/gperftools/releases/download/gperftools-2.9.1/gperftools-2.9.1.tar.gz
tar xzf gperftools-2.9.1.tar.gz
cd gperftools-2.9.1/
./configure
make && sudo make install
cd ..
Installing Snort
- Download Snort source code and building it according to your configurations. (Please note that the
—enable-tcmallocflagcan be omitted if you prefer not to use TCMalloc)1 2 3 4
wget https://github.com/snort3/snort3/archive/refs/heads/master.zip unzip master.zip cd snort3-master ./configure_cmake.sh --prefix=/usr/local --enable-tcmalloc
- Install the build
1
2
cd build
make && sudo make install
- Update shared libraries to avoid any errors while trying to run Snort
1
sudo ldconfig
Test the installation by running
snort -V. Incase of successful installation, you will be able to see similar output to the following: ```bash1 2 3 4 5 6 7 8 9 10 11 12 13
,,_ -*> Snort++ <*- o" )~ Version 3.1.58.0 '''' By Martin Roesch & The Snort Team http://snort.org/contact#team Copyright (C) 2014-2023 Cisco and/or its affiliates. All rights reserved. Copyright (C) 1998-2013 Sourcefire, Inc., et al. Using DAQ version 3.0.11 Using LuaJIT version 2.1.0-beta3 Using OpenSSL 3.0.8 7 Feb 2023 Using libpcap version 1.10.3 (with TPACKET_V3) Using PCRE version 8.39 2016-06-14 Using ZLIB version 1.2.13 Using LZMA version 5.4.1
1
2
3
4
5
6
7
8
* To test the default configuration file against Snort, run snort -c /usr/local/etc/snort/snort.lua and you will get the following result on success:
```bash
    ...
    ...
    ...

    Snort successfully validated the configuration (with 0 warnings).
    o")~   Snort exiting
Congratulations! You just successfully installed Snort.
Configuration
Configuring network interfaces
To allow Snort to sniff and filter out network traffic, we need to put our network interface into promiscuous mode.
- First, we need to figure out which interface we want to listen on. To list out all network interfaces, we can use the
ip addcommand.1 2 3 4 5 6 7 8 9 10 11 12
1: lo: <LOOPBACK,UP,LOWER_UP> mtu 65536 qdisc noqueue state UNKNOWN group default qlen 1000 link/loopback 00:00:00:00:00:00 brd 00:00:00:00:00:00 inet 127.0.0.1/8 scope host lo valid_lft forever preferred_lft forever inet6 ::1/128 scope host valid_lft forever preferred_lft forever 2: eth0: <BROADCAST,MULTICAST,UP,LOWER_UP> mtu 1500 qdisc fq_codel state UP group default qlen 1000 link/ether 08:00:27:0e:34:8d brd ff:ff:ff:ff:ff:ff inet 10.0.2.15/24 brd 10.0.2.255 scope global dynamic noprefixroute eth0 valid_lft 85903sec preferred_lft 85903sec inet6 fe80::a00:27ff:fe0e:348d/64 scope link noprefixroute valid_lft forever preferred_lft foreverWe will be using the
eth0interface. - Then, we set the interface to promiscuous mode
1
sudo ip link set dev eth0 promisc on
We also need to ensure that Generic Offloading (GRO) is turned off. To do that, we can use the following command:
1
ethtool -k eth0 | grep receive-offload
In case it is turned on like this…
1
2
generic-receive-offload: on
large-receive-offload: off [fixed]
… we need to turn it off
1
sudo ethtool -K eth0 gro off lro off
Finally, we need to create a service to ensure our configuration is persistent across reboots.
- Create a service file for Snort
1
sudo nano /etc/systemd/system/snort3-nic.service - Add the following lines to the file and save it ```bash [Unit] Description=Set Snort 3 NIC in promiscuous mode and Disable GRO, LRO onboot After=network.target [Service]
Type=oneshot
ExecStart=/usr/sbin/ip link set dev eth0 promisc on
ExecStart=/usr/sbin/ethtool -K eth0 gro off lro off
TimeoutStartSec=0 RemainAfterExit=yes
[Install]
WantedBy=default.target
1
2
3
* Reload the system daemon
```bash
    sudo systemctl daemon-reload
- Finally, enable the Snort service
1
  sudo systemctl enable --now snort3-nic.service
- Check the status of the service
1
2
3
4
5
6
7
8
$ service snort3-nic status
● snort3-nic.service - Set Snort 3 NIC in promiscuous mode and DisableGRO, LRO on boot
   Loaded: loaded (/etc/systemd/system/snort3-nic.service; enabled;preset: disabled)
   Active: active (exited) since Sun 2023-03-26 06:45:43 EDT; 30s ago
  Process: 3143 ExecStart=/usr/sbin/ip link set dev eth0 promisc on(code=exited, status=0/SUCCESS)
  Process: 3144 ExecStart=/usr/sbin/ethtool -K eth0 gro off lro off(code=exited, status=0/SUCCESS)
 Main PID: 3144 (code=exited, status=0/SUCCESS)
      CPU: 7ms
Configuring Rules
To make sure the rule creation and filtering process goes smoothly, we need to create a few necessary directories and files for our rules and logs.
1
2
3
4
sudo su
mkdir -p {/usr/local/etc/rules,/usr/local/etc/so_rules/,/usr/local/etc/lists/,/var/log/snort}
touch /usr/local/etc/rules/local.rules /usr/local/etc/lists/default.blocklist
exit
Then we need to add the rules to the /usr/local/etc/rules/local.rules as follows:
- Detecting DoS/DDoS attack on your web server
1
alert tcp any any -> 192.168.1.42 80 (flags:S; detection_filter: track by_src, count 100, seconds 10; msg:"Possible SYN Flood Attack"; sid:1000001;)
- Detecting SQL Injection attack on your web server
1
alert tcp any any -> 192.168.1.42 80 (msg:"Possible SQL injection attack detected"; flow:to_server,established; content: "%27" ; sid:100002; rev:1;)
- Detecting Port Scanning activity
1
alert tcp any any -> any any (msg:"Port scanning detected"; flags:S; detection_filter:track by_src, count 3, seconds 10; sid:100003; rev:1;)
- Detecting Network Interception attempts
1
alert ip any any -> any any (msg:"Possible network interception detected"; fragbits: M; sid:100004; rev:1;)
- Detecting Password/Login bruteforcing
1
alert tcp any any -> 192.168.1.42 80 (msg:"Password/login attempt detected"; content:"POST"; content:"username"; content:"password"; sid:100005; rev:1;)
- Detecting basic WiFi attack (DHCP Fingerprinting)
1
alert udp any any -> any 67 (msg:"Possible DHCP fingerprinting detected"; content:"|01 01 06|"; sid:10006;)
- Detecting Custom Packet Generation on network
1
alert tcp any any -> any any (msg:"Possible crafted TCP packet detected"; flags: AP; dsize: 0; sid:10007; rev:1;)
Finally, we can test these rules against Snort
1
snort -c /usr/local/etc/snort/snort.lua -R /usr/local/etc/rules/local.rules
To allow Snort to run according to these rules by default, go to line 182 of your
/usr/local/etc/snort/snort.luafile and ensure theipssection to be as follows: ```lua ips = { – use this to enable decoder and inspector alerts
enable_builtin_rules = true,
include = RULE_PATH .. “/local.rules”,
– use include for rules files; be sure to set your path – note that rules files can include other rules files – (see also related path vars at the top of snort_defaults.lua)
variables = default_variable }
1
2
3
Verify the configuration
```bash
snort -c /usr/local/etc/snort/snort.lua
Configuring Logs
There are a lot of options when it comes to the way you want Snort to log your events and errors. However, we will be using the alert_fast option to prevent noisy logs.
To do this, we can go to the output section of the /usr/local/etc/snort/snort.lua file and modify it so it looks like this
1
2
3
4
5
6
7
8
9
10
11
12
13
14
15
16
17
18
19
20
21
22
23
--------------------------------------------------------------------------
-- 7. configure outputs
--------------------------------------------------------------------------

-- event logging
-- you can enable with defaults from the command line with -A <alert_type>
-- uncomment below to set non-default configs
alert_csv = { }
alert_fast = {file=true, packet=false, limit=10,}
alert_full = { }
alert_sfsocket = { }
alert_syslog = { }
unified2 = { }

-- packet logging
-- you can enable with defaults from the command line with -L <log_type>
log_codecs = { }
log_hext = { }
log_pcap = { }

-- additional logs
packet_capture = { }
file_log = { }
Finally, test the configuration
1
snort -c /usr/local/etc/snort/snort.lua
Configuring Snort to run as a service
In production environments, it is recommended to run Snort as a daemon instead of running it on the console. To run it as a daemon, we need to configure some settings.
First, we need to create a non-privileged and non-logon user for the Snort daemon
1
useradd -r -s /usr/sbin/nologin -M -c SNORT_IDS snort
Then, we need to grant Snort the rights to its logging directory.
1
2
sudo chmod -R 5775 /var/log/snort
sudo chown -R snort:snort /var/log/snort
We need to create a service file for snort
1
sudo nano /etc/systemd/system/snort3.service
and add the following lines to it
1
2
3
4
5
6
7
8
9
[Unit]
Description=Snort3 NIDS Daemon
After=syslog.target network.target
[Service]
Type=simple
ExecStart=/usr/local/bin/snort -c /usr/local/etc/snort/snort.lua -s65535 -k none -l /var/log/snort -D -u snort -g snort -i eth0 -m 0x1b--create-pidfile
ExecStop=/bin/kill -9 $MAINPID
[Install]
WantedBy=multi-user.target
Finally, we need to enable and start the Snort service
1
2
sudo systemctl enable snort3
sudo service snort3 start
We can check the status of the Snort daemon as follows:
1
2
3
4
5
6
7
8
9
10
11
12
$ sudo service snort3 status
● snort3.service - Snort3 NIDS Daemon
     Loaded: loaded (/etc/systemd/system/snort3.service; enabled;preset: disabled)
     Active: active (running) since Sun 2023-03-26 07:42:17 EDT; 3s ago
   Main PID: 4810 (snort)
      Tasks: 2 (limit: 9440)
     Memory: 61.9M
        CPU: 259ms
     CGroup: /system.slice/snort3.service
             └─4810 /usr/local/bin/snort -c /usr/local/etc/snort/snortlua -s 65535 -k none -l /var/log/snort -D -u >

Mar 26 07:42:17 kali systemd[1]: Started snort3.service - Snort3 NIDS Daemon.
Great! Now that we have Snort up and running, we can start testing the rules we made.
Testing our Rules (Optional but Recommended)
Testing your rules is a must before adding them to your IDS in a production environment. This helps ensure that the rules are properly tuned and have no negative affect.
We can look at alerts generated by Snort (in real-time) with the following command:
1
tail -f /var/log/snort/alert_fast.txt
Here are the IP addresses assigned to my machines (for your reference):
1
2
192.168.1.22 #attacker machine
192.168.1.42 #victim/web server
Rule#1:
Detecting a SYN Flood (DoS/DDoS) attack:
1
alert tcp any any -> 192.168.1.42 80 (flags:S; detection_filter: track by_src, count 100, seconds 10; msg:"Possible SYN Flood Attack"; sid:1000001;)
To test this rule, we can use a simple hping3 command:
1
sudo hping3 --flood -S -p 80 192.168.1.42
This will generate the following alerts:
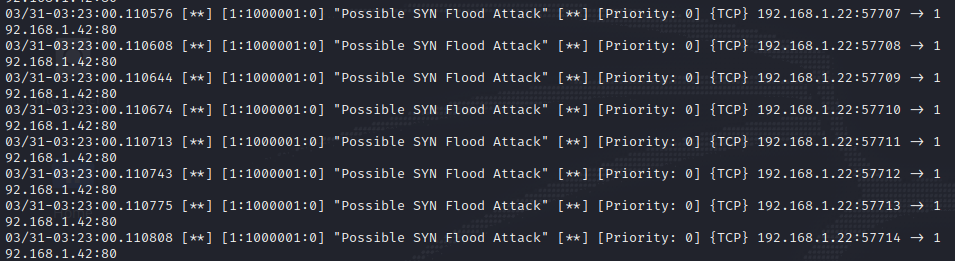 Testing DoS/DDoS Rule
Rule#2:
Detecting an injection attack on your web server:
1
alert tcp any any -> 192.168.1.42 80 (msg:"Possible SQL injection attack detected"; flow:to_server,established; content: "%27" ; sid:100002; rev:1;)
First, we need to create a test website and host it on an apache server. We can do this by creating a file called index.php in the /var/www/html/ directory and adding the following contents to it:
1
2
3
4
5
6
7
8
9
10
11
12
<!DOCTYPE html>
<html>
<head>
    <title>Test Page</title>
</head>
<body>
    <form action="" method="GET">
        <input type="text" name="id">
        <input type="submit" value="Submit">
    </form>
</body>
</html>
We can then start our apache server with the following command:
1
sudo systemctl restart apache2
To test this rule, we can use the curl command:
1
curl "http://192.168.1.42/index.php?id=%27OR" -v
This will generate the following alert:
 Testing SQL Injection Rule
Rule#3:
Detecting port scanning activity on your network:
1
alert tcp any any -> any any (msg:"Port scanning detected"; flags:S; detection_filter:track by_src, count 3, seconds 10; sid:100003; rev:1;)
Since this rule only detects SYN scans, we can use the following nmap command to test it:
1
sudo nmap -sS 192.168.1.42
This will generate the following alert:
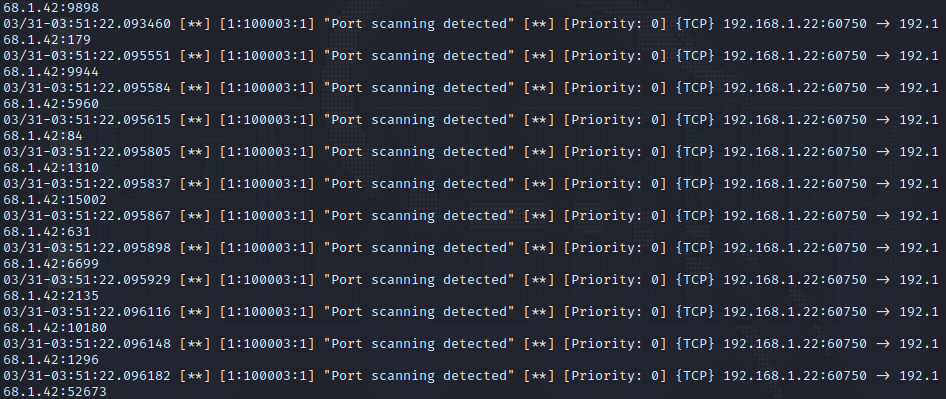 Testing SYN Scanning Rule
Rule#4:
Detecting network interception attempts:
1
alert ip any any -> any any (msg:"Possible network interception detected"; fragbits: M; sid:100004; rev:1;)
We can use the following hping3 command to generate fragmented packets:
1
sudo hping3 192.168.1.42 -c 5 -d 1500 -F -f
This will generate the following output:
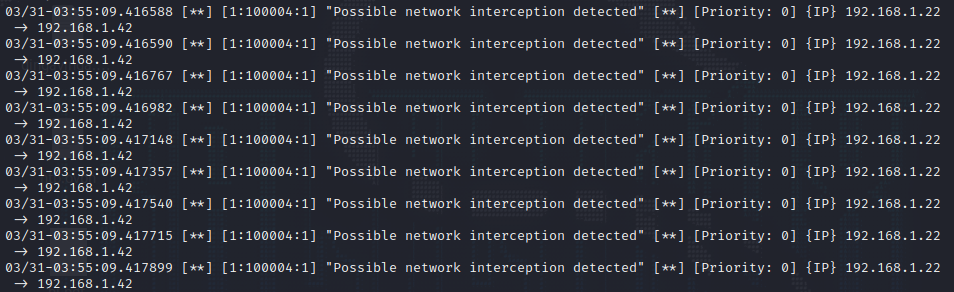 Testing Network Interception Rule
Rule#5:
Detecting login attempts on your web server:
1
alert tcp any any -> 192.168.1.42 80 (msg:"Password/login attempt detected"; content:"POST"; content:"username"; content:"password"; sid:100005; rev:1;)
To test this rule, we first need to create an api endpoint login.php in our /var/www/html directory. We can use the following test endpoint:
1
2
3
4
5
6
7
8
9
10
11
12
13
14
15
16
<?php

session_start();

$username = $_POST['username'];
$password = $_POST['password'];

if ($username === 'admin' && $password === 'password123') {
  $_SESSION['user'] = 'admin';
  header('Location: /dashboard.php');
  exit();
} else {
  echo 'Invalid username or password.';
}

?>
We can restart our Apache server with the following command:
1
sudo systemctl restart apache2
To test this rule, we can use the curl command:
1
curl -d "username=test&password=invalid" -X POST http://192.168.1.42/login.php
This will generate the following alert:
 Testing Login attempt Rule
Rule#6:
Detecting DHCP Fingerprinting:
1
alert udp any any -> any 67 (msg:"Possible DHCP fingerprinting detected"; content:"|01 01 06|"; sid:10006;)
To test this rule, we can create a file called dhcp_packet.raw and add the contents 01 01 06 to it. Then we can use the following hping3 command to send a DHCP request to the victim server:
1
sudo hping3 -2 -c 1 -p 67 -s 68 -d '010106' -E dhcp_packet.raw 192.168.1.42
This will generate the following alert:
 Testing DHCP Fingerprinting Rule
Rule#7:
Detecting crafted packet in network:
1
alert tcp any any -> any any (msg:"Possible crafted TCP packet detected"; flags: AP; dsize: 0; sid:10007; rev:1;)
This this specific rule tests for a crafted packet with the ACK and PSH flags set, we can use the following hping3 command to test it:
1
sudo hping3 -c 1 -A -P -p 80 --data 0 192.168.1.42
This will generate the following alert:
 Testing Crafted TCP packet rule
Conclusion
Snort is an extremely powerful, open-source solution for intrusion detection. They say “when life gives you lemons, make lemonade”. How this saying relates to our topic is that no matter how tedious it might seem to configure Snort, it will help protect your organization from thousands of attacks if you tune and monitor it properly.